How to Automate a Website Image Crawler Twitter Bot
Working in social media can be stressful, monotonous, and repetitive. Twitter is one of the most effective ways to engage with your followers. Visualizations and screenshots of content can be very effective and attention grabbing for your audience. Thanks to Selenium + Twitter Python API Tweepy, there are ways to automate this! This tutorial will teach you how to automate social media posting on Twitter by working with Selenium to take screenshots of any website.
Part 1: Automating Selenium to Take Screenshots
Prerequisites
- Download a web driver for the browser, check all the supported browsers from here.
- You have an option for downloading either FireFox or Chromedriver for automating internet browsing.
- Install selenium in your working environment. Below is the pip command for installation of the latest version:
pip install --upgrade selenium
pip install webdriver_manager
Step 1: Import the modules at the top of our code
from selenium import webdriver
from PIL import Image
from selenium.webdriver.support.ui import WebDriverWait
from selenium import webdriver
from selenium.webdriver.support import expected_conditions as EC
from selenium.webdriver.common.by import By
from requests import get
import datetime
import requests
from webdriver_manager.chrome import ChromeDriverManager
Step 2: Write a function to initiate the browser and take screenshot and save the picture locally
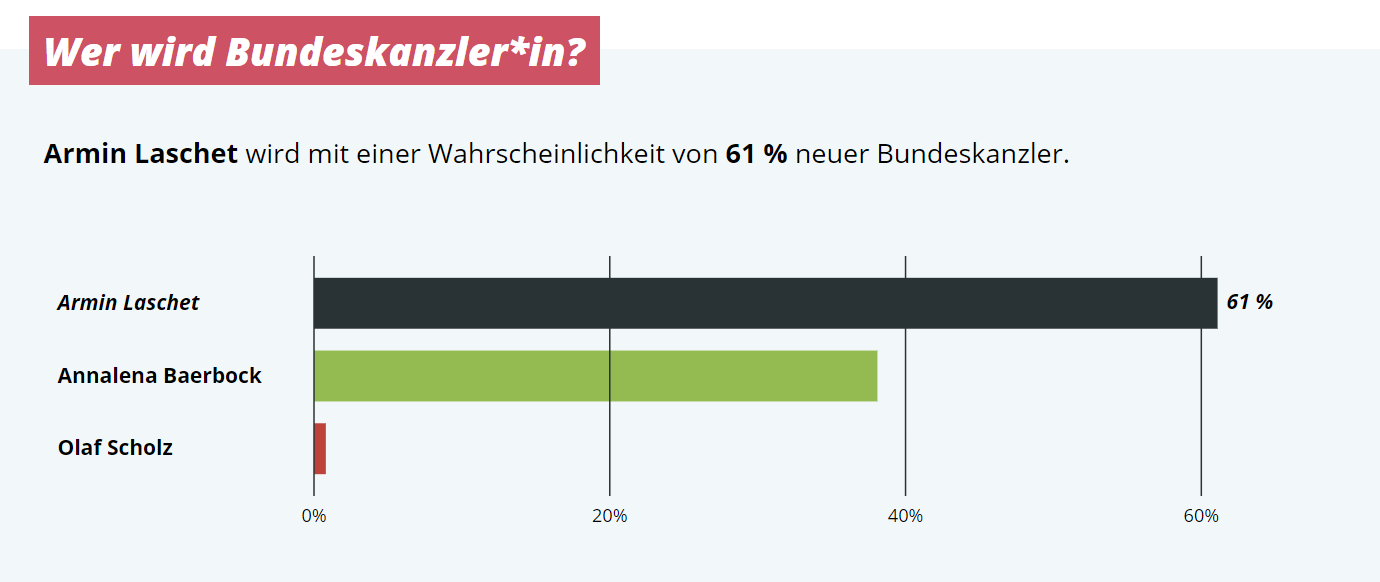
Just for example, I will use our 2021 German Election Forecasting website to monitor which candidate is leading the votes.
Step 3: Initialize Chrome webdriver
We initialize the Chrome webdriver below by installing the latest version of Chrome driver via the ChromeDriverManager library. Then we direct the URL to the web driver to request access.
driver = webdriver.Chrome(ChromeDriverManager().install())
driver.get("https://www.wer-gewinnt-die-wahl.de/")
We then wait patiently for 60 seconds and subsequently delay of 10 seconds until the webpage to finish loading:
driver.implicitly_wait(60)
delay = 10
Since we want to take a screenshot with Selenium, the snapshot might require some scrolling, so we use the window.scrollTo(0, 1000) to tell the browser to scroll down to 1000 unit frames (you might have to play around with this parameter to fit the frames that you want from the website):
driver.execute_script("window.scrollTo(0, 1000)")
WebDriverWait(driver, delay).until(EC.presence_of_element_located((By.CLASS_NAME, 'chart-container')))
Then, we tell the webdriver to wait until the chart element appears before we proceed to take the screenshot.
Step 4: Save screenshot
We use save_screenshot('nameyourpic.png') function to save the screenshot to your local machine:
driver.save_screenshot('fullPageScreenshot.png')
fullImg = Image.open('fullPageScreenshot.png')
Step 5: Crop image
Next, after we have saved the photo, we can automatically crop the frames to our desired size (again, the dimensions are represented by the photo size) which indicates height, width, and X, Y positions:
cropImg = fullImg.crop((0,0,1530,854)) # x,y,width,height of picture
cropImg.save(str(date)+'_koalition.png')
driver.quit()
Finally, voilà! check your local directory for the saved photo!
Let’s put all the code together:
from webdriver_manager.chrome import ChromeDriverManager
from selenium import webdriver
from PIL import Image
from selenium.webdriver.support.ui import WebDriverWait
from selenium import webdriver
from selenium.webdriver.support import expected_conditions as EC
from selenium.webdriver.common.by import By
from requests import get
import datetime
import requests
from webdriver_manager.chrome import ChromeDriverManager

date = datetime.datetime.now().strftime('%Y-%m-%d')

def get_green_shot(date):
    driver = webdriver.Chrome(ChromeDriverManager().install()) #webdriver.Chrome()
    driver.get("https://www.wer-gewinnt-die-wahl.de/")
    driver.implicitly_wait(60)
    delay = 10

    driver.execute_script("window.scrollTo(0, 1000)")
    WebDriverWait(driver, delay).until(EC.presence_of_element_located((By.CLASS_NAME, 'chart-container')))

    driver.save_screenshot("fullPageScreenshot.png")
    fullImg = Image.open('fullPageScreenshot.png')
    cropImg = fullImg.crop((0,0,1530,854)) # x,y,width,height of picture frame
    cropImg.save(str(date)+'screenshot.png')
    driver.quit()
    print('SUCCESSFUL screenshot taken and saved')

if __name__ == "__main__":
    get_green_shot(date)
Part 2: Automating Twitter to post your screenshot on a timely manner
Prerequisite for this part is applying for the Twitter Developer API. You can find the instructions here. After this you have your API tokens, you must retrieve these four keys:
- consumerKey
- consumerSecret
- accessTokenKey
- accessTokenSecret
Step 1: Authentication
Authenticate your API tokens by importing the tweepy (which we installed in part 1 of this tutorial) and ensure your tokens are in string format.
# Authenticate to Twitter
import tweepy
auth = tweepy.OAuthHandler(CONSUMER_KEY, CONSUMER_SECRET)
auth.set_access_token(ACCESS_TOKEN, ACCESS_TOKEN_SECRET)

# Create API object
api = tweepy.API(auth)
Step 2: Create content
Write your message or whatever content you want to post. api.update_with_media(img, status=message) is the function that pushes your image and message to Twitter via the API.
########################  POST Images & message ############################
message = """31.03.21 | #Wahlprognose Update 🗳️

Wahrscheinlichkeit, dass #GrünRotRot 🟢🔴🔴 (#Grüne - #SPD - #dieLinke) die
rechnerische Mehrheit erhält, ist seit Beginn des Monats
von 9% auf 34% gestiegen

#bundestagswahl #btw21 #wergewinntdiewahl
"""

#img = r"2021_03_31_TwitterScreenshot.png" # inside the directory
img = image
api.update_with_media(img, status=message)
An alternative to this is, if you don’t want to make this human touch every time you post, then you can write all your posts in a google sheet all at once and automate your existing posting to regenerate traffic for your organization. The tutorial is here.
Let’s put it all together:
 import os
 import tweepy
 from PIL import Image
 import datetime

def Tweet(image,message):
    """
    message:: string that reflect the message in the Twitter post
    image:: path of png picture in the same directory
    """
    CONSUMER_KEY = 'xxx'
    CONSUMER_SECRET = 'xxx'
    ACCESS_TOKEN = 'xxx'
    ACCESS_TOKEN_SECRET = 'xxx'

    # Authenticate to Twitter
    auth = tweepy.OAuthHandler(CONSUMER_KEY, CONSUMER_SECRET)
    auth.set_access_token(ACCESS_TOKEN, ACCESS_TOKEN_SECRET)

    # Create API object
    api = tweepy.API(auth)


    ########################  POST Images & message ############################
    message = """31.03.21 | #Wahlprognose Update 🗳️

    Wahrscheinlichkeit, dass #GrünRotRot 🟢🔴🔴 (#Grüne - #SPD - #dieLinke)
    die rechnerische Mehrheit erhält, ist seit Beginn des Monats
    von 9% auf 34% gestiegen

    #bundestagswahl #btw21 #wergewinntdiewahl
    """

    #img = r"2021_03_31_TwitterScreenshot.png" # inside the directory
    img = image
    api.update_with_media(img, status=message)
    return 'message tweet successful'


if __name__ == "__main__":
    message = input("*Please Insert your daily tweet here, or leave it blank*: ")
    image = str((date)+'screenshot.png')
    Tweet(image, message)
Now, you can go to your website, take a screenshot with your Selenium browser, save it on your computer, automatically crop the image, and finally automate the posting of the image with a message straight to Twitter. After writing your own script, you can now run a timely automated job on windows or cron job to run your script at a certain time of the day or week to monitor events of your own interest. Tutorial is here. This application will not only make your job easier as a social media administrator, but also saves you time by automatically monitoring events with a screenshot linking your website and affiliation. Ultimately, this application can greatly drive up traffic to your website and your organization. Happy coding!